
Table of Contents
Our Helmets protect us from injuries and shield us dust, cold, sun, and rain. That’s great! However, they can also give shelter to harmful helmet fungus. That is why keeping the helmet clean is super important. If you are facing the same problem, this article will guide you how to clean helmet fungus and revive your gear’s safety and style.
Understanding Helmet Fungus:
Before diving into the cleaning process, let’s understand this helmet fungus. Helmet fungus often grows in the form of mold or mildew. It flourishes well in damp and dark area. It’s not only unsightly but it can also pose health risks and can damage the helmet’s materials over time. Moreover, it can stick on your scalp.
Identifying Helmet Fungus
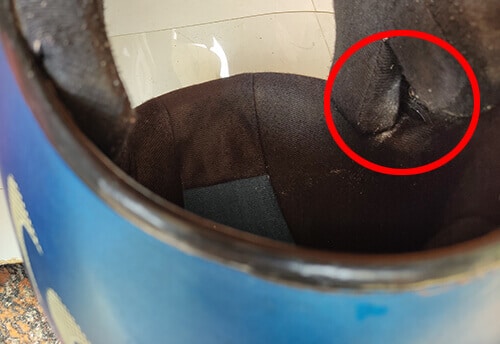
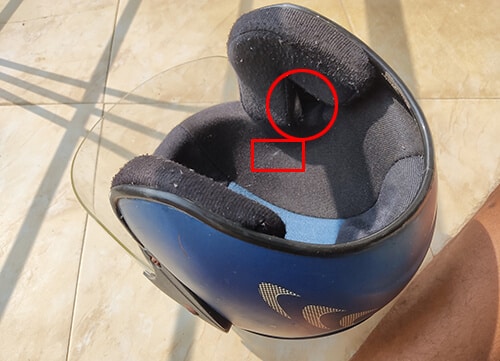
Visible spots: Black, white, gray, or green patches.
Musty odor: An unmistakable, unpleasant smell.
Texture changes: Surface irregularities or soft spots.
This is How to Clean Helmet Fungus Step by Step
The process of removing fungus from helmet is very easy. However, you must take care of your safety and hygiene. If you follow the following process, you can clean fungus from motorcycle helmet, bicycle helmet or any other type like football helmet too.
Step 1: Preparation of Workspace and Tools
Ventilation and safety:
Your own safety is important before doing anything. Therefore, choose an open area or a well-ventilated room for enough airflow. It will help in the drying process and prevent further fungal proliferation. Adequate ventilation also reduces the inhalation of any harmful cleaning agents. Wear disposable hand gloves before doing anything.
Arrangement of required items:
It is essential to arrange all cleaning materials for a seamless process. For fungus cleaning you will need 1) a mild detergent with gentle cleansing properties, 2) a soft cloth that won’t scratch the helmet’s surface, 3) a brush with soft bristles, and 4) water for dilution and rinsing purposes. You should set all these items at one place.
Disassembling the helmet:
Before cleaning the helmet, take out all the detachable components like visors, padding, liner or other removable parts. Disassembling the parts makes it easy to locate the fungus spots and clean thoroughly. It is also helpful while drying the components. Don’t worry if some parts are not removable.
Step 2: Surface Inspection and Brushing
Visual Examination:
Carefully inspect the helmet’s surface. Along with visible spots, also look closely inside the helmet to see if there is any growth of fungus. Check every removable as well as attached part of the helmet carefully. Helmet fungus is seen in the form of white, black, or green patches. Such helmets are generally smelly.
Dry Brushing:
After detecting the fungus, do dry brushing with the soft-bristled brush to dislodge and remove visible surface fungus gently. Make sure that you employ delicate strokes while brushing the fungal spots. Otherwise, you may damage the helmet’s exterior or interior fabrics. This step is crucial in preparing the helmet for a deeper cleaning process.
Step 3: Mild Cleansing
Detergent Solution:
Create a cleansing solution by diluting the mild detergent in water. Any detergent can do but a gentle and non-abrasive detergent is better. It is to avoid any adverse reactions with the helmet’s materials. This solution effectively breaks down and eliminates fungal residue.
Soft Cloth Application:
Dip the soft cloth into the prepared detergent solution and carefully wipe the affected areas. In this way wash the entire affected area thoroughly and gently. Do it again and again until the fungal spot vanishes completely.
Rinse and Dry:
After cleansing, use a clean, damp cloth to wipe away any remaining detergent residue from the helmet’s surface. Allow the helmet to air-dry completely before moving on to the next steps. Complete drying of helmet prevents the formation of new fungal growth.
Step 4: Deep Cleaning for Embedded Fungus
Interior minute Inspection:
After cleaning the visible fungus, examine the interior of the helmet for any signs hidden fungus. Inspect the inner lining, padding, and chin strap thoroughly. Fungal growth in these areas could be easily overlooked. I will recommend that wipe out every component with the solution for the complete eradication of fungus.
Apply Anti-Fungal Solution:
The next step is use of specialized helmet cleaners or anti-fungal sprays for the interior surfaces. These solutions effectively target and eliminate fungal spores in helmet. This ensures a comprehensive eradication of any residual growth.
Thorough Drying:
In this final stage, dry every removed part and the interior of the helmet completely before reassembling them. If moisture left inside the helmet, it can promote fungal growth again. That’s why, thorough drying is very important to prevent future issues.
Post-Cleaning Care: Maintenance Tips
Dry Storage:
Humidity is a favorite condition for fungus therefore, you should always store the helmet in a dry environment. The storage areas should be well-ventilated so that there will not be moisture accumulation inside the helmet. It is a smart practice to hang the helmet on a hook or placing it on a helmet stand. Enough air circulation prevents fungus formation on or inside the helmet.
Avoid Enclosed Areas:
This point is actually extension of the previous point. Avoid to keep helmet in an enclosed space. Such areas can trap moisture and promote fungal growth. There is a little scope of ventilation and so drying of helmet completely is not possible.
Regular Cleansing Routine:
If you want to keep your helmet free from fungus, then you should check and clean it regularly. Specially, your should wash inner linings and pads of the helmet. If you do this, you can stop growing fungus in its early stage. In another words, if you keep your helmet neat and clean, there is hardly any chance of growing any unhealthy issue.
If you ride in hot atmosphere, it is good to have a hot weather helmet because it absorbs sweat and keep you dry.
Prompt Action:
If any fungal spots are noticed during inspections, take immediate action. Follow the above mentioned cleaning process and apply anti-fungal solutions to the affected areas. If you delay the cleaning, the fabric or material of the helmet may have more damage.
Sunlight Exposure:
Whenever possible, expose your helmet to sunlight for a limited duration. Sunlight has natural anti-fungal properties that can help prevent the development of fungus. However, be cautious not to overexpose the helmet to sunlight. Excessive UV exposure might cause degradation of materials of the helmet.
Mild Cleansing as Preventive Measure:
Perform gentle cleaning with mild detergent and water as a preventive measure after every two weeks. Even if no visible fungal growth is present, a routine cleaning practice can thwart any potential fungal spores. In this way, you can maintain the helmet’s hygiene. You can do it to clean smelly helmet too.
Conclusion
Helmet is a true friend on road who protects you on the road. That is why taking care of it very important. If it is affected with fungus, cleaning it with special method is the best care. In this article, we have thoroughly discussed how to clean helmet fungus. You can follow the mentioned steps to improve the hygiene of the helmet. Remember, a clean helmet protects you better, lasts longer, and remains visually appealing!